How to convert old photo negatives into digital images
Your dog has eaten the negatives of your old family photos and the memories of your great gran are starting to fade… Does this sound familiar? No problem, because you’ve made digital copies of your negatives. And this is how.
I’m sure you or your relatives have negatives of old photos that haven’t been converted into digital images. They’re from a time when fewer photos were taken. Wouldn’t it be a shame if these memories went lost?
As you know, digitised photos can be copied as many times as you like and stored in different places, such as on your USB stick, in a safe or in the cloud. The cloud is your best bet, as your photos are safe there – even if your dog eats your USB stick, your house burns down or the negatives get lost in other mysterious circumstances.
I recently bought a scanner and started converting negatives of photos from myself and my family into digital images. This isn’t too tricky, but it took me a while to figure out how best to do it. To make sure you don’t make the same mistakes as I did, here’s a summary of my learnings and advice.
As I can’t cover every special case, I’m going to ignore slide films, black-and-white films and scanning with the special software Silverfast. If you have advice on these, please write a comment below this article.
Types of scanners
There are three types of devices that turn negatives into digital files:
- Mini scanners, which are basically cameras
- Flatbed scanners with transparency unit
- Special film scanners
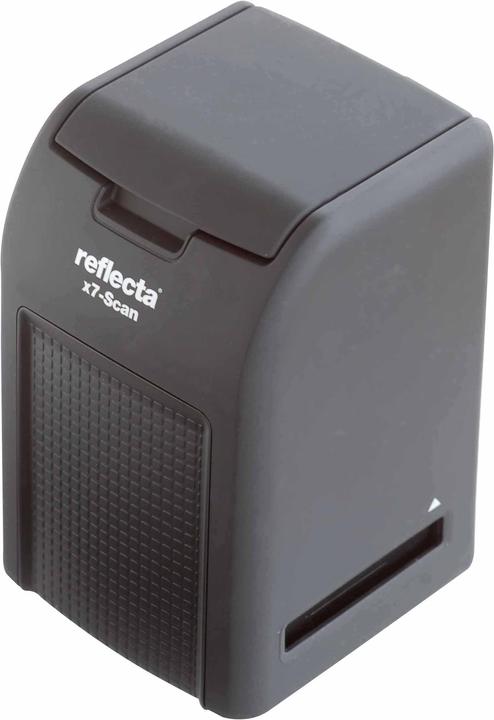
A mini scanner is your least expensive version, which also needs least space and is very fast. It doesn’t really scan, but rather take a photograph of the negative, which is also the largest weakness of these devices. The image quality is not as good as with actual scanners.

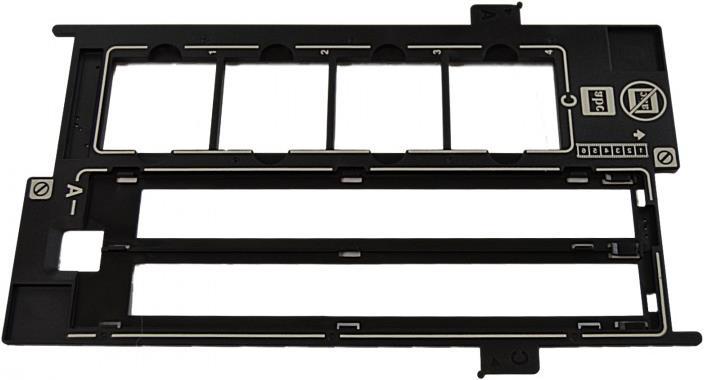
Your second option is a regular flatbed scanner that has a transparency unit. Insert a slide holder in the centre of the scanning area to position the negative where the scanner works with maximum resolution.
Your third option is a special film scanner – a device that scans negatives or slides. These devices are rather compact, but more expensive than flatbed scanners. Yet, affordable models do exist. This is one example:
I bought the Epson flatbed scanner displayed above and I’m happy with it. It might need a lot of space, but then again, most scanners do.
Inserting the negatives
Placing the negatives on the glass as you would with a piece of paper isn’t a good idea. You need to use a holder. Remove the white cover underneath the lid.
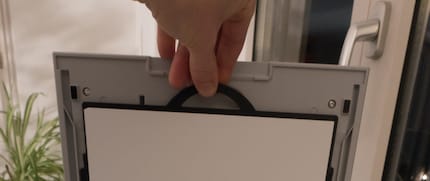
The letters on the side of the scanning area and the holder indicate how to insert the holder. Make sure to put the negatives in the right way around or you’ll need to flip all images later on the PC and adjust the numbering.
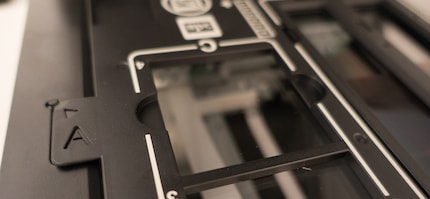
If you get two holders, you’ll be able to work faster and continue scanning if one of them breaks.
Removing the paper strip: Many negatives have a paper strip attached to them. Originally, this strip was used by photo labs to note down the number of reorders per image. But as negatives don’t fit into the holder if the paper strip attached to them and as you don’t need the paper once you have a digital version of your photos, go ahead and remove the paper strips.
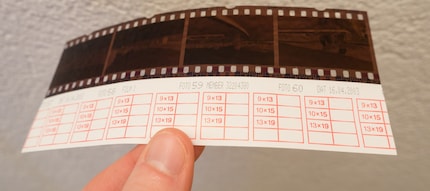
Initially, I cut the strips off with a carpet knife, but then realised that there’s a better way: The paper strip as attached to the negative with a plastic sheet that’s easy to tear off. My advice is to try this out on a negative that doesn’t have important photos on it – as for instance the first few photos on the film, which are often unexposed.
Special formats: Not all negatives come in 35 mm format. Some of mine are from a Kodak Instamatic, a 126 film camera. These photos are square and have a side length of 28 mm, which means that they don’t fit in the holders I used above.
Epson doesn’t provide special holders for this size, but luckily, these negatives fit into the medium format holders is you don’t remove the paper strips. This meant I could scan the negatives without needing to make my own holders. The downside was that the automatic separation of individual images didn’t work, so I still needed to fit frames to keep the photos apart.
There aren’t any holders for 110 films either. Not that I have films in this size, I’m just saying. What I’d try if I had such films would be attaching them to the holder on only one side or, alternatively, cut them to the size of small images (if the paper strips are still attached to them). You’re sure to find a way, but it might take some time.
The scanning process
Once you’ve positioned the negatives correctly, select professional mode in the main window of Epson’s scanning software. If you’ve chosen the right type of film, you’ll be able to see a preview – a rough scan of the photos – and have a look at what’s on them.
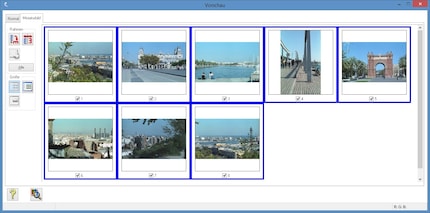
Regular small format films are automatically divided into individual images by the software. This saves you work. Unfortunately, the software doesn’t always recognise where the borders are if a photo is dark along the edges or if you’re scanning films with special formats. In these cases, you’ll have to define the borders yourself. Make sure to do this accurately, or the colour correction won’t work properly.
Once you’ve made all the right settings – more to follow on this – click «Scannen» (scan).
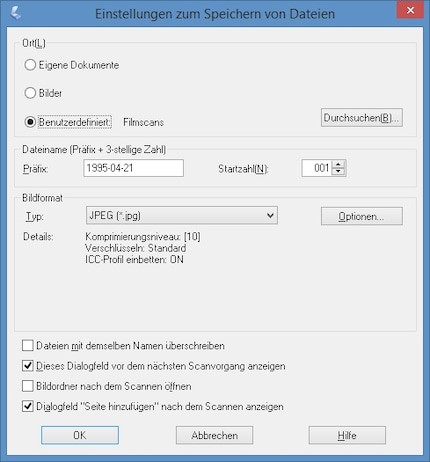
The option «Bildordner öffnen» (open image folder) made my computer crash several times, so I stopped using it.
About image editing
You absolutely need to make sure that your settings are applied to all photos by selecting all photos when you’re in the preview mode. Only the ones that are selected (marked with a blue frame) are included; all others will be scanned with default settings.
When it comes to scanning, there are two options: You either try to create a final image with the scanning software or you only scan the image and post edit in in another program.
I decided to go with the first option, as it meant I could see results sooner. It’s not as easy to correct negatives as digital photos. Depending on the film, there can be an extreme colour cast, which requires a lot of adjusting. When I tried adjusting settings in the RAW converter (Lightroom in my case), the colours didn’t turn out as good as in Epson’s colour corrector. In addition, every photo had its own colouring, which took the charm away from the film.
If you’d rather edit scans on another program, make sure to select 48-bit colour. This way, you have enough information about the colours to be able to edit the photo properly. As JPEG doesn’t support 48 bit, you’ll need to save your files as Tiff.
The scanning software won’t make any colour corrections if you deactivate colour management in the menu point «Konfiguration» (configurations).
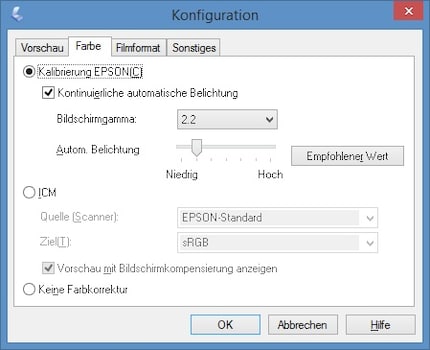
How to get the best photos out of the scanning software
This is what the main window of Epson’s scanning software looks like. This is a German version, I’ll refer to the individual settings in German and give you an English description:
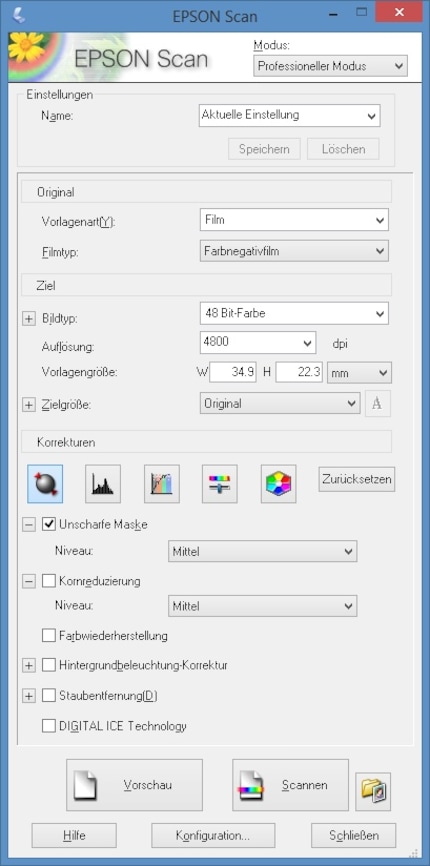
In general: In my opinion, automatic colour correction works well and doesn’t require much post-adjusting. If required, lower the automatic exposure slightly; you can always increase the brightness if an image turns out too dark, but it’s difficult to tone down too bright parts.
Bildauflösung (resolution): In small image format, 4800 dpi results in a similar resolution to photos of today’s digital cameras. A higher resolution delivers larger files, but not more detailed photos. In some cases, depending on the image quality, 3200 dpi is also enough.
Korrekturen (adjustments): The first icon in the window is the automatic colour correction. Reset the corrections if it’s already activated or make adjustments by going to the second and fourth icon.
Unscharfe Maske (unsharp mask): This setting increases image sharpness, but also noise. It’s activated by default, but can be deactivated if you’d rather adjust the sharpness of your images later on.
Kornreduzierung (descreening): This can help if you’re working with photosensitive films (400 ASA and higher). With my 200 ASA photos, the only difference I saw was that photos lost sharpness slightly.
Farbwiederherstellung (solour restoration): This setting boosts colours, especially in old negatives. But if the original colours are good, they’ll be falsified with this setting.
(Hintergrundbeleuchtungskorrektur (backlight correction): According to Epson, this setting corrects shots that were taken against the light. Personally, I didn’t use this setting, as this is easy to do in a post-editing program (if necessary).
Staubentfernung (dust removal): This option is deactivated if the following one (ICE) is activated. It’s not possible to activate them both at the same time. As I always work with ICE, I never use this software-based dust removal.
Digital ICE Technology: In my opinion, this is the most important setting. In addition to the regular scan, the photo is scanned with an infrared lamp. This lamp recognises scratches, dust particles and the such, but not colours. This way, it can distinguish scratches and dust from the rest of the photo and extract the unneeded bits. This option works a treat; I always apply it, even though the scanning process takes a lot longer this way.

Without ICE, I’d have to work with special gloves and in a dust-free environment, possibly even with a special cleaning brush. This is why digital ICE Technology is so handy and is included in scanners of various brands.
Don’t forget the most important thing
Your digital photos are only protected against loss if you store back-up copies in a physically separate place. Don’t forget this small but essential step when you're creating digital images from your negatives or it might have all been a waste of time – or literally, a dog’s breakfast.
My interest in IT and writing landed me in tech journalism early on (2000). I want to know how we can use technology without being used. Outside of the office, I’m a keen musician who makes up for lacking talent with excessive enthusiasm.


