
Wi-Fi 6 vs. Wi-Fi 5: speed testing Devolo’s Powerline Mesh Wi-Fi system
The latest Devolo Powerline adapters boast Wi-Fi 6. They let you create a Mesh Wi-Fi system via radio and your power supply. For the sake of comparison, I pit it against a predecessor system with Wi-Fi 5 in a speed test.
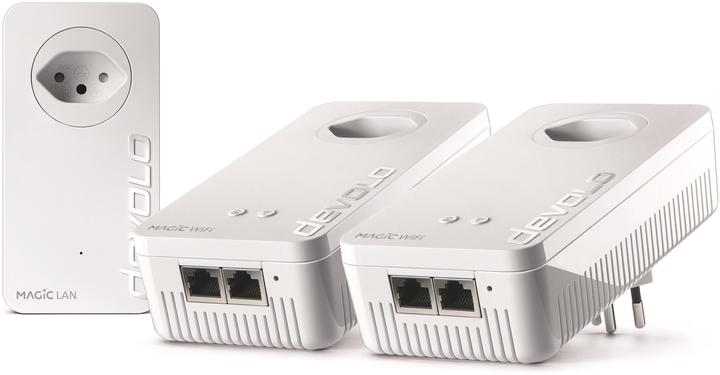
I’ve got seven Powerline adapters in front of me. More specifically, two Devolo Mesh Wi-Fi systems, which distribute the Internet via power cable and radio. I have enough adapters in the «Magic 2 WiFi 6» and «Mesh WiFi 2» systems to create three Wi-Fi access points with each. One of the systems offers Wi-Fi 6, while the other supplies Wi-Fi 5. In terms of which is faster, that’s something I’ll find out in the speed test. This involves measuring the signal level, download speed and latency in all the rooms in my flat.
In theory, Wi-Fi 6 provides more data processing performance. However, my hunch before carrying out the tests is that the systems will be neck and neck as far as speed is concerned. All the more so because the small adapters in the system don’t differ in the number of antennas or size. Moreover, Wi-Fi 6 primarily provides benefits for larger devices. But only if the devices support the latest Wi-Fi technology – and for best results, if the neighbouring network devices do too.
The reason I’m relying on three Wi-Fi access points is because I know my two-floor 140-m² flat and its Wi-Fi obstacles well. Devolo kindly gave me both Mesh systems to test out.


Devolo Magic 2 WiFi 6 Extension
2400 Mbit/s
The Mesh Wi-Fi 6 multi-room kit contains three adapters. One of them feeds Internet into the power supply. While two other adapters receive the signal and establish the new Wi-Fi. To create the three access points as planned, I also added an extra single adapter.
The Mesh Wi-Fi 5 multi-room kit, on the other hand, comes with three Wi-Fi-enabled adapters. Each of them can also be used as a feed-in adapter, which is why I didn’t need to get any extra.
According to the manufacturer, both systems feature the following specs:
| Devolo Magic 2 WiFi 6 | Devolo Mesh WiFi 2 | |
|---|---|---|
| Powerline
standard: | G.hn | G.hn |
| Powerline
transmission rate: | up to 2400 Mbps | up to 2400 Mbps |
| Powerline
reach: | up to 500 m | up to 500 m |
| Antennas: | 4 × internal | 4 × internal |
| Ports: | 2 × RJ45 Gigabit LAN | 2 × RJ45 Gigabit LAN |
| Wi-Fi standards: | Wi-Fi 6 (IEEE 802.11ax), Wi-Fi 5 (IEEE 802.11ac), Wi-Fi 4 (IEEE 802.11n), IEEE 802.11g, IEEE 802.11b, IEEE 802.11k/r (Seamless/Fast Roaming), IEEE 802.11v (AP-Steering) | Wi-Fi 5 (IEEE 802.11ac), Wi-Fi 4 (IEEE 802.11n), IEEE 802.11g, IEEE 802.11b, 802.11k/r (Seamless/Fast Roaming), IEEE 802.11v (AP-Steering) |
| Wi-Fi
transmission rate: | bis 1800 Mbps | bis 1200 Mbps |
| Operating modes: | Access Point | Access Point |
| Dimensions: | 15.2 × 7.6 × 4 cm | 15.2 × 7.6 × 4 cm |
| Security: | AES (Advanced Encryption Standard), WPA, WPA2, WPA3, WPS (Wi-Fi Protected Setup) | AES (Advanced Encryption Standard), WPA, WPA2, WPA3, WPS (Wi-Fi Protected Setup) |
| Features: | Latest standard Mesh Wi-Fi, guest network, WiFi clone, time control, parental control, integrated power socket | Mesh Wi-Fi, guest network, Wi-Fi Clone, time control, parental control, integrated power socket |
What can the Powerline adapter do?
Compared with other access points or routers, Powerline adapters are small. But their location is fixed as they have to plug directly into a wall socket. This gives them an advantage over other network devices, by allowing them to establish a network via the power supply. As a result, they can transfer Internet directly from the basement to the loft – provided that the wiring and fuse box are good enough. You can then plug in a network cable at the desired destination and obtain the gigabit LAN. The adapters serve purely as access points and don’t have a router mode.
The adapters I road-tested were then able to use this to create Wi-Fi. If other access points are added, it ensures an extended range for the first Wi-Fi adapter as well as a dedicated network at the desired location.
Unfortunately, the power supply can’t spread Internet around the house equally well in every home. For instance, the wiring in my flat isn’t the best. When I change floor, I lose quite a lot of data processing performance with Powerline. To give you an example, the following image illustrates the situation with the latest adapters:
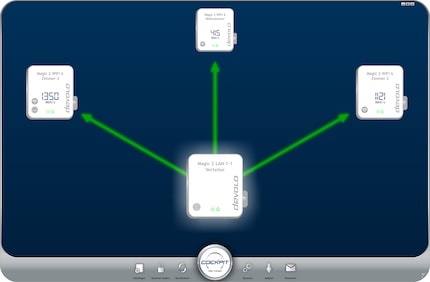
The feed-in adapter of the Mesh Wi-Fi 6 system depicted above is situated on the same floor as both of the target adapters, which indicates over 1,100 megabits per second (Mbps). Only 415 Mbps reach the floor below. It’s important to bear in mind that the speed displayed also includes the control data. Empirically, the actual speed that reaches the end devices equates to about a third of that.
Setting up the adapter: how to install it and where to put it
Adapters can amplify the current Wi-Fi or create a new one. If you want the benefits of Wi-Fi 6, it’s best not to mix the latest adapters with older ones. Nevertheless, it is possible.
Don’t skip this bit – it’s important: never attach Powerline adapters to a power strip or multiplug. Always plug the adapter into the wall socket first and then the power strip into the plug that integrates the adapter. Failing to do that can significantly affect the quality of the Powerline connection. If you use the adapter in a three-plug wall socket, the adapter will cover all inlets.
The only time you can use a power strip is when you’re setting up the adapters. This is because the purpose is just to connect the adapters to each other. To do this, I plug in all the adapters from one system into one socket within the space of three minutes. Starting with the adapters that don’t act as Internet feed-in. As soon as they’ve connected – it takes at most a minute – a white home LED light will start to flash. That’s when you can plug in the adapter, which receives the Internet from your modem or router via LAN cable. Afterwards, the adapters automatically create a network via the power supply and predefined Wi-Fi. If three minutes aren’t enough, you can also restart the pairing by pressing the PLC button on the device.
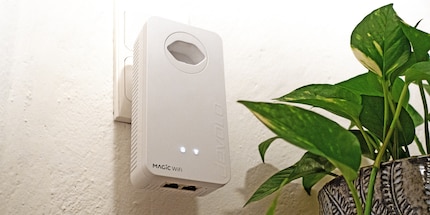
After that, you can fine-tune the configuration quickly and easily using a LAN cable with your PC via the Devolo cockpit and a web interface. Alternatively, before installing you can make a note of the Wi-Fi key from one of the adapters (it’s on the back) and configure it via Wi-Fi. You can also set it up using your smartphone via Devolo’s «Home Network» app.
Flat floor plan and adapter locations
To help me find the best location for the adapters, I tried out all of the sockets in my two-floor 140-m² loft flat. What’s fundamental is positioning the adapters as centrally as you can, which is something I only managed to do to a certain extent.
The location of the feed-in adapter is fixed. It goes into the same socket as the modem. As you can see in the location overview below, that’s in room 3 on the upper floor. The blue Wi-Fi symbol in room 3 shows the additional adapter in the Wi-Fi 6 system. You won’t find this in the Wi-Fi 5 system because every Wi-Fi-enabled adapter in this set-up can take care of the Internet supply.
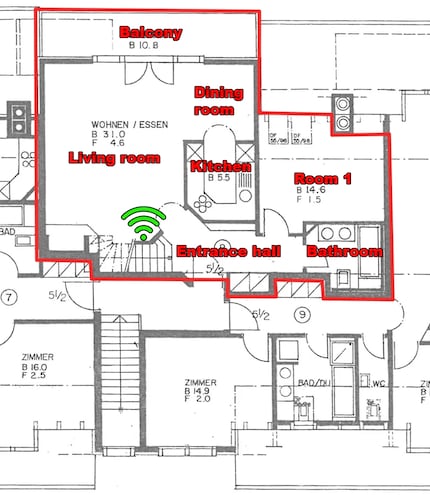
When I sounded out the sockets, I discovered I could reach Powerline speeds of 260 to 450 Mbps, depending on the socket. I also noticed that Wi-Fi with only one access point struggles to go from room 3 to 2. That’s why I equipped the large room that’s set up as a craft room and studio with an additional adapter. On the floor below, both systems barely manage to reach speeds of 100 Mbps in the best sockets. For the time being, at least. After two to three days of acclimatisation the speed improves a bit, as the measurements below indicate.
So, make sure to give a new Powerline network or Wi-Fi enough time to reach its full potential.
Wi-Fi speed test: speed, ping and signal strength per room
What works well on both systems straight away is Wi-Fi switching between different adapters. It’s not just fast thanks to the activated «fast roaming» option (IEEE 802.11r); it’s also seamless. In practice, this means I don’t drop off a video call when I walk through the flat.
For comparison’s sake, I did all the tests using the same Wi-Fi 6-enabled notebook, which has also taken part in all of the speed tests to date. My private Cloud storage serves as a rival in the network and is a NAS that goes by the name of Boba Fett. I use software called «LAN Speed Test» to determine the speed, and ping my NAS to check the latency. Thanks to «NetSpot» software, we can see signal strength and related heat maps.
Results
Both Powerline Mesh Wi-Fi systems perform in the 5 GHz frequency band as follows:
| Location | Mesh Wi-Fi 6 (5 GHz frequency band)
speed / ping / signal strength | Mesh Wi-Fi 5 (5 GHz frequency band)
speed / ping / signal strength |
|---|---|---|
| Entrance hall | 122.88 Mbps / 7 ms / -63 dBm | 118.29 Mbps / 6 ms / -57 dBm |
| Living room | 142.71 Mbps / 6 ms / -55 dBm | 123.93 Mbps / 6 ms / -53 dBm |
| Dining room | 119.35 Mbps / 6 ms / -66 dBm | 109.45 Mbps / 6 ms / -72 dBm |
| Kitchen | 135.48 Mbps / 6 ms / -60 dBm | 116.67 Mbps / 6 ms / -59 dBm |
| Balcony | 125.03 Mbps / 9 ms / -71 dBm | 112.94 Mbps / 8 ms / -69 dBm |
| Room 1 | 117.14 Mbps / 8 ms / -72 dBm | 108.58 Mbps / 8 ms / -73 dBm |
| Bathroom | 128.67 Mbps / 8 ms / -65 dBm | 110.04 Mbps / 7 ms / -66 dBm |
| Corridor | 307.20 Mbps / 6 ms / -59 dBm | 328.72 Mbps / 5 ms / -52 dBm |
| Room 2 | 278.95 Mbps / 5 ms / -52 dBm | 251.16 Mbps / 4 ms / -51 dBm |
| Room 3 | 437.86 Mbps / 4 ms / -47 dBm | 428.32 Mbps / 4 ms / -53 dBm |
| Room 4 | 351.52 Mbps / 6 ms / -68 dBm | 398.09 Mbps / 4 ms / -53 dBm |
| Shower/WC | 375.02 Mbps / 6 ms / -65 dBm | 367.10 Mbps / 6 ms / -62 dBm |
| Ø 1. Loft | 127.32 Mbps / 7 ms / -65 dBm | 114.27 Mbps / 7 ms / -64 dBm |
| Ø 2. Loft | 350.11 Mbps / 5 ms / -58 dBm | 354.68 Mbps / 5 ms / -54 dBm |
| Ø Flat | 220.15 Mbps / 6 ms / -62 dBm | 214.44 Mbps / 6 ms / -60 dBm |
This is the picture we get in the 2.4 GHz frequency band:
| Location | Mesh Wi-Fi 6 (2.4 GHz frequency band)
speed / ping / signal strength | Mesh Wi-Fi 6 (2.4 GHz frequency band)
speed / ping / signal strength |
|---|---|---|
| Entrance hall | 116.37 Mbps / 7 ms / -57 dBm | 121.03 Mbps / 6 ms / -50 dBm |
| Living room | 137.29 Mbps / 6 ms / -50 dBm | 125.57 Mbps / 6 ms / -49 dBm |
| Dining room | 113.92 Mbps / 7 ms / -59 dBm | 102.62 Mbps / 7 ms / -59 dBm |
| Kitchen | 122.61 Mbps / 6 ms / -55 dBm | 110.71 Mbps / 7 ms / -57 dBm |
| Balcony | 104.86 Mbps / 9 ms / -67 dBm | 96.44 Mbps / 10 ms / -66 dBm |
| Room 1 | 109.59 Mbps / 9 ms / -65 dBm | 91.96 Mbps / 11 ms / -70 dBm |
| Bathroom | 110.45 Mbps / 8 ms / -64 dBm | 108.80 Mbps / 8 ms / -64 dBm |
| Corridor | 148.07 Mbps / 7 ms / -55 dBm | 157.35 Mbps / 7 ms / -54 dBm |
| Room 2 | 163.49 Mbps / 5 ms / -52 dBm | 160.59 Mbps / 5 ms / -52 dBm |
| Room 3 | 166.13 Mbps / 4 ms / -47 dBm | 161.41 Mbps / 4 ms / -47 dBm |
| Room 4 | 124.20 Mbps / 7 ms / -65 dBm | 144.70 Mbps / 6 ms / -54 dBm |
| Shower/WC | 120.08 Mbps / 8 ms / -66 dBm | 139.27 Mbps / 7 ms / -56 dBm |
| Ø 1. Loft | 116.44 Mbps / 7 ms / -60 dBm | 108.16 Mbps / 8 ms / -59 dBm |
| Ø 2. Loft | 144.39 Mbps / 6 ms / -57 dBm | 152.66 Mbps / 6 ms / -53 dBm |
| Ø Flat | 128.09 Mbps / 7 ms / -59 dBm | 126.70 Mbps / 7 ms / -57 dBm |
On the lower floor, the Wi-Fi 6 system fares slightly better with an average of 127.32 Mbps compared with 114.27 Mbps. On the upper loft floor, both systems work well and yield on average 350 Mbps. In comparison with other Mesh systems, that doesn’t sound very much. But given the physical properties involved, such as the small size, this isn’t a bad result. Especially as the walls in my flat are sturdy and weaken the Wi-Fi signal further.
When I connect the test laptop via LAN cable to the adapters, the ping in my flat is still low. The signal passes through the router between the NAS, modem (router), feed-in adapter and target adapter. Depending on the socket, it can take two to four milliseconds before the NAS pings the answer.
If I ping the NAS via the Wi-Fi, the signal goes by Powerline and radio signal. This adds a corresponding mini delay on top. The ping measurements from both Mesh systems are almost identical. In the most important rooms, the ping is four to seven milliseconds. On the balcony, in the bathroom and in a storage room including the indoor hobby garden (room 1), I measure eight to eleven milliseconds. Across the whole flat, the response times are on average a satisfactory six milliseconds in the 5 GHz frequency band and seven milliseconds in the 2.4 GHz frequency band. With these kinds of results, you can even game (at an amateur level).
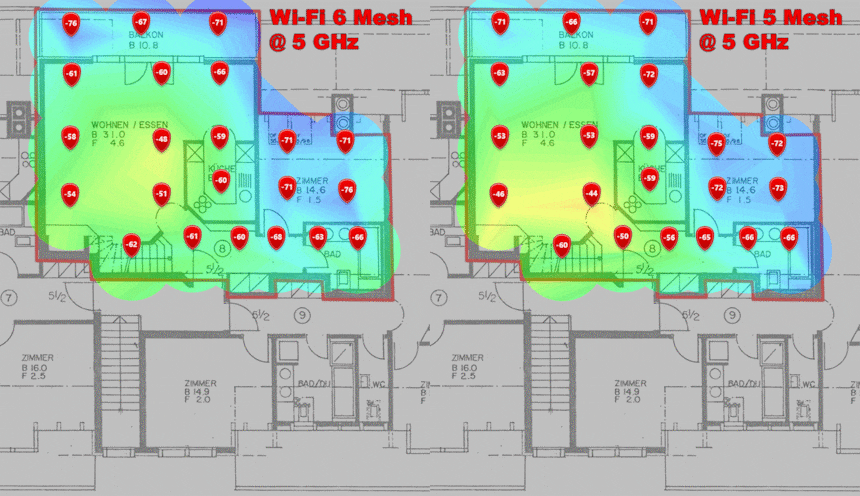
Visualising the 5 GHz Wi-Fi coverage
With Mesh Wi-Fi 6, the Wi-Fi in room 3 is offset by about three metres. This has an effect on the signal strength in room 4. Compared to Mesh Wi-Fi 5, it loses 15 decibel milliwatts (dBm). Instead of a respectable -53 dBm, there’s an ample -68 dBm – the higher the dBm value, the better.
The dBm loss is bearable. All my devices can also communicate easily with the adapter at -68 dBm – the speed in room 4 is still at 351.52 Mbps. The areas that aren’t as good are room 1 and the balcony, where the dBm for both Mesh systems is wavering around -70. Nevertheless, I get 108 to 125 Mbps with smartphone and laptop reception as well as data transfers. That’s equivalent to four to five UHD Netflix streams.
In terms of averages in the flat, the 5 GHz frequency band with the Mesh Wi-Fi 6 gives -62 dBm and -60 dBm with the Wi-Fi 5. In the 2.4 GHz frequency band, the results come in at -59 and -57 dBm respectively. These are good average values. Depending on the device, anything above -70 dBm is problematic. Once it hits -80 dBm, it’s done for. Oh yeah, and with some smartphones, including iPhones, it’s meant to mean faster changes. With these phones, the 5 GHz frequency band is only meant to be favoured up to -65 dBm and the 2.4 GHz band up to -70 dBm before the device switches to mobile data.
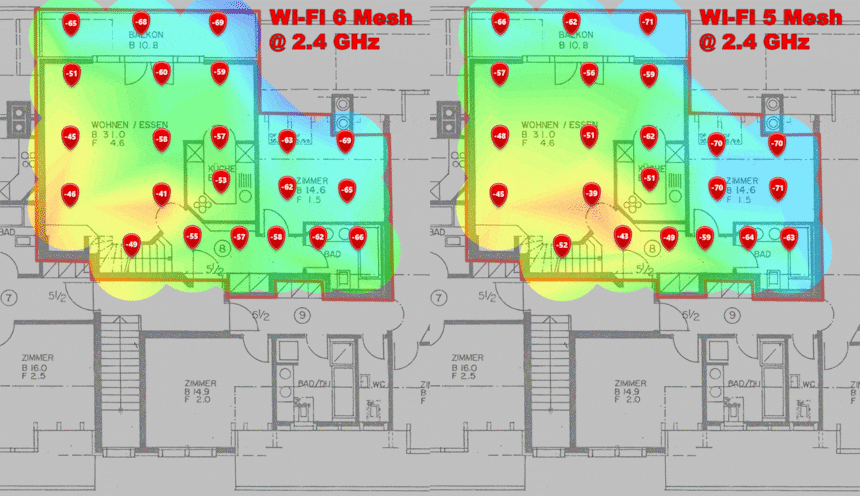
In the heat maps below, you can see the signal strength depicted with colours. This lets you determine at a glance where the Wi-Fi performs well. Red is the best colour, but yellow and green are also your friends. Before the heat map turns to turquoise, the signal is meant to be strong enough for any end device (even for an iPhone). The more blue the colour, the worse the signal strength.


Visualising the 2.4 GHz Wi-Fi coverage
The 2.4 GHz frequency band reaches slightly further and, as a result, is a bit less blue.

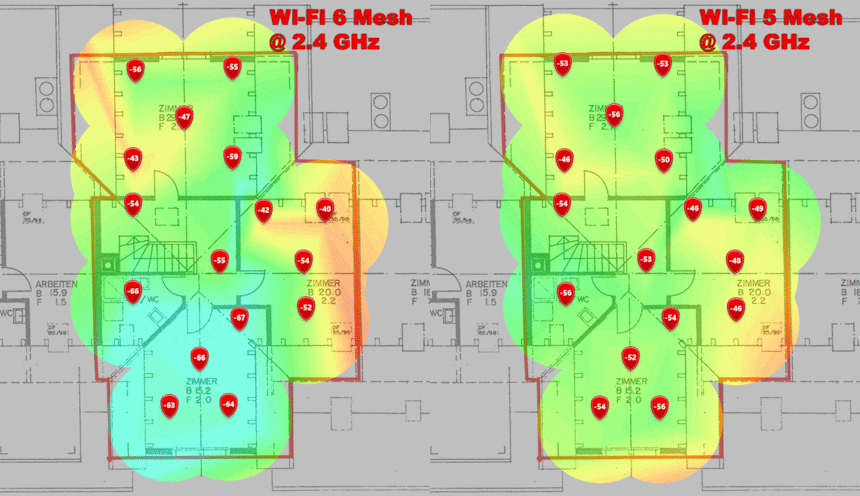
Comparison with the competition
When it comes to the Mesh Wi-Fi systems I’ve tested in my flat, it’s always been about the band and «normal» Wi-Fi router or access points that connect together via radio signals. I only used to do rigorous checks on these with two Wi-Fi access points. However, when compared with the Devolo Powerline adapters, they have the edge due to more antennas or larger dimensions. And that’s clear from the side-by-side comparison. The following tables are organised according to data processing performance.
The 5 GHz comparison:
| Mesh Wi-Fi system | Ø Flat (5 GHz frequency band)
speed / ping / signal strength |
|---|---|
| Netgear Mesh: Orbi AX6000
(Wi-Fi 6, 2 access points) | 629.64 Mbps / 5 ms / -58 dBm |
| Linksys Mesh: Velop AX4200
(Wi-Fi 6, 2 access points) | 525.23 Mbps / 7 ms / -54 dBm |
| Swisscom Mesh Wi-Fi 6
(Internet-Box 3 + WLAN-Box 2) | 482.14 Mbps / 3 ms / -55 dBm |
| Asus Mesh: ZenWiFi AX6600
(Wi-Fi 6, 2 access points) | 467.36 Mbps / 3 ms / -57 dBm |
| Devolo Mesh: Magic 2 WiFi 6
(3 access points) | 220.15 Mbps / 6 ms / -62 dBm |
| Devolo Mesh: Mesh WiFi 2
(Wi-Fi 5, 3 access points) | 214.44 Mbps / 6 ms / -60 dBm |
The 2.4 GHz comparison:
| Mesh Wi-Fi system | Ø Flat (2.4 GHz frequency band)
speed / ping / signal strength |
|---|---|
| Linksys Mesh: Velop AX4200
(Wi-Fi 6, 2 access points) | 150.82 Mbps / 7 ms / -59 dBm |
| Asus Mesh: ZenWiFi AX6600
(Wi-Fi 6, 2 access points) | 139.77 Mbps / 3 ms / -56 dBm |
| Netgear Mesh: Orbi AX6000
(Wi-Fi 6, 2 access points) | 128.53 Mbps / 5 ms / -54 dBm |
| Devolo Mesh: Magic 2 WiFi 6
(3 access points) | 128.09 Mbps / 7 ms / -59 dBm |
| Devolo Mesh: Mesh WiFi 2
(Wi-Fi 5, 3 access points) | 126.70 Mbps / 7 ms / -57 dBm |
| Swisscom Mesh Wi-Fi 6
(Internet box 3 + Wi-Fi box 2) | 117.26 Mbps / 4 ms / -59 dBm |
Verdict: small and convenient, but not for every power supply
What I like most about Powerline is the simple installation. I don’t have to think about where to put the new device or how to install the power cable. What’s more, the network comes up trumps with the power supply when paired with the Mesh Wi-Fi. The signal coverage ticks the boxes for me and the ping stays relatively low. On the upper floor, the power cables also contribute to data processing performance, and the adapters provide 251 to 437 Mbps per Wi-Fi. Powerline is often just so-so in older buildings. Or if you’re in a situation like me and live across several floors, where the speed on the lower level drops from 108 to 142 Mbps.
But on the whole, both Mesh systems fare almost equally well. The fact that the older Mesh Wi-Fi 5 performs slightly better on the upper floor has more to do with the different Wi-Fi adapter location in room 3 rather than the technology. And the modest edge that Mesh Wi-Fi 6 has over Wi-Fi 5 on the lower floor is down to the fractionally better connection via the power supply. Perhaps it helps that the system has its own dedicated feed-in adapter.
If the hefty premium is neither here nor there, when in doubt, the Wi-Fi 6 adapter should be your best bet. One of the most advantageous things about the latest standard is that you get to use lots of end devices as soon as these also support Wi-Fi 6. If your power cables are more or less in good nick and around 350 Mbps Wi-Fi fits your needs, I can recommend both Powerline Mesh Wi-Fi systems. As far as the price goes, the Devolo adapters are in the upper mid category compared to other Mesh systems.
I find my muse in everything. When I don’t, I draw inspiration from daydreaming. After all, if you dream, you don’t sleep through life.


