
Product test
BeeStation Plus review: Synology’s data storage for phones
by Jan Johannsen

The Adobe Bridge software is free and a pretty powerful tool for photo management. Nevertheless, it is still quite unknown. Depending on what other software you use, it can be very useful.
If you take a lot of photos, you have a lot of photos. And there are always more. Managing these huge collections is annoying, but unfortunately unavoidable. "I once had this photo of the main railway station in the middle of the night, but when was it? How can I find it again?" Software can help with questions like this by naming files appropriately and labelling them with keywords (e.g. "train station", "night").
This can be done in two different ways:
Although Bridge is from the best-known image editing manufacturer, the software has been around for a long time and is free, many people don't know it. This is probably because you don't need it if you use Lightroom or something similar. And it wasn't free for a long time either.
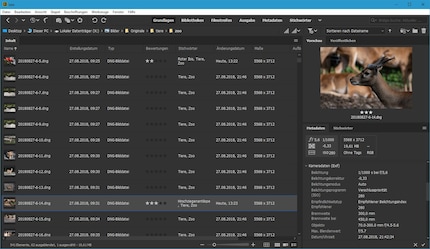
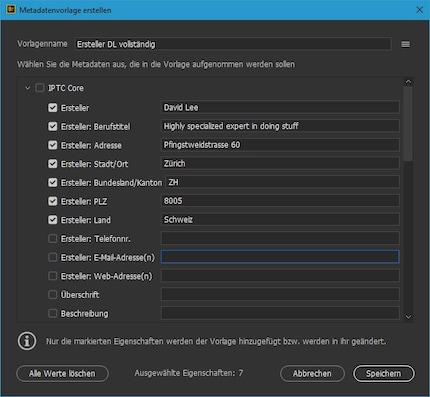
Bridge is a file manager for media files. Especially for photos. For example, you can clearly display the metadata of a photo. This includes EXIF recording data, i.e. camera model, recording time, settings, but also IPTC data such as author, copyright and much more. With the exception of the camera settings, you can edit all metadata, even for several photos at once. With the help of your own metadata templates, you can apply metadata changes to entire collections.
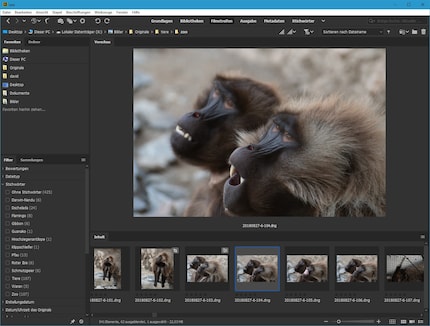
The management tools also include keywords or tags. You can add keywords with one click. You can also add star ratings or self-defined labels such as "In progress".
By the way, keywords are also imported from Lightroom. But only if you have activated the option "Automatically save changes in XMP" in the Lightroom settings. Lightroom then saves all editing information, including metadata, in a separate file with the extension .xmp. Otherwise, this information is only saved in the Lightroom catalogue and is not accessible to other applications such as Bridge.
What I find very practical: I can see images that are in RAW or DNG format as thumbnails or even large in a preview. This means I don't have to open Photoshop or Lightroom just to quickly see which image I'm looking at. The thumbnails can be resized as required.
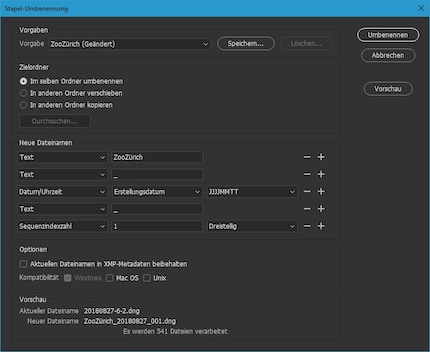
One of the more useful features is batch renaming. Files can be renamed meaningfully according to very precisely defined templates.
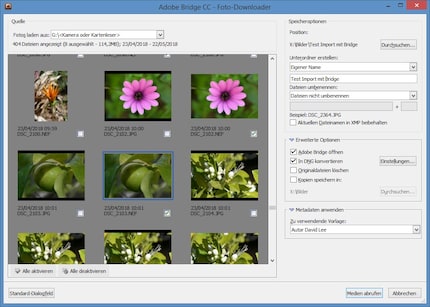
The Bridge can also import images directly from the camera or memory card. This is great because you get free updates for Bridge and can always read the latest RAW formats. Even better: Bridge also offers to convert all RAW files to DNG when importing. This means that if your RAW converter can't read the latest RAW files, you can still continue to use it, as almost all RAW software can handle DNG. Except for DxO PhotoLab. This actually good RAW converter can only read DNGs if it can also read the RAW type from which the DNG was created. But then you don't need a DNG at all.
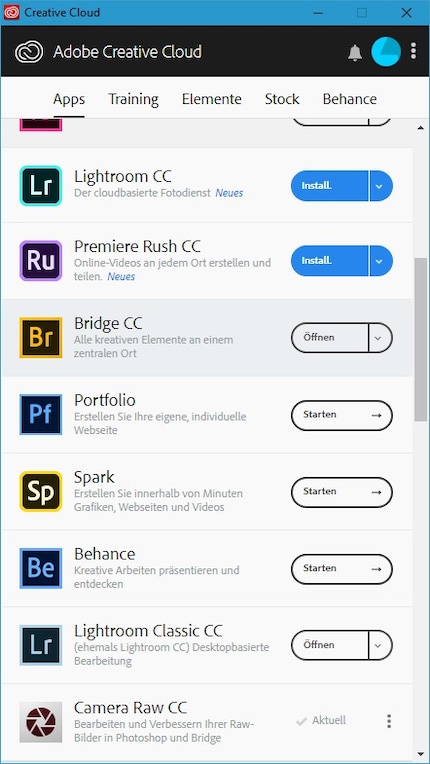
To use Adobe Bridge, you need an Adobe ID. If you read DRM-protected eBooks that are not from Apple or Amazon, then you already have such an ID. Otherwise, you can create one by going to the Adobe website, clicking on "Sign in" in the top right-hand corner and registering using the corresponding link.
Once you are registered, you can download the Adobe Creative Cloud software for free. This is a kind of software centre that manages your Adobe programs, in particular displays and installs updates. You can then install Adobe Bridge under "Apps". It is one of the very few applications that can be used without a paid plan.
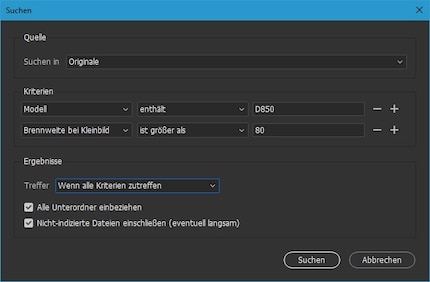
Call up the search dialogue with the shortcut Ctrl-F. In the dialogue, you can define very precisely what you want to search for. You can also simply select the criterion "All metadata". It is very important at the beginning that you activate the option "Include non-indexed files". This is because indexing will only take place over time if you use Bridge on an ongoing basis.
Once everything has been indexed, you can also use the search field at the top right of the Bridge window instead of the search dialogue. It will initially say "Search Adobe Stock". But don't fret, because the drop-down menu next to the magnifying glass also offers the option "Bridge search: Current folder".
Search queries that you need again and again are best saved as a Smart Collection. A smart collection is nothing more than a saved search template. To do this, open the "Collections" tab on the left and click on the mini icon with the cogwheel. If you hover over it with the mouse, the tooltip "New smart collection" appears.
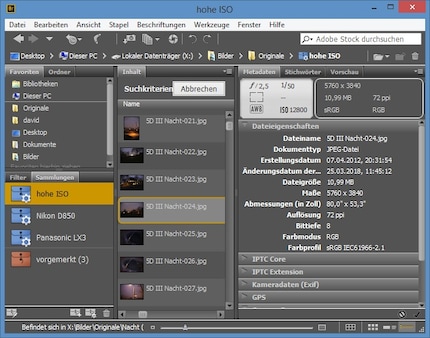
There are also normal collections. This is an alternative to the folder structure. It has the advantage that a photo can be stored in several collections.
What you should not do: Use the filters across the entire photo library. Under the "View" menu there is the command "Show items in subfolders". If I activate this in my main directory, Bridge lists all 30,000 photos that I have ever saved on the disc. Theoretically, these photos could now be filtered by keywords etc., but in practice this is far too slow. Bridge is overwhelmed with filtering so many photos. Use the search function instead, it's fast.
Tip: If you select "Show items in subfolders" and then go to the lunch break, Bridge creates the complete index and you can then use the search field.
And another tip: You can select a specific aperture value such as f/5.6 as a filter criterion (right on the "Filter" tab), but not as a search criterion. The corresponding search criterion is "Exposure", which combines shutter speed and aperture. Bridge will still find corresponding photos with the search query "Exposure contains f/3.2".
If you want to specify a specific aperture range, you will have to use Windows Explorer. I hate to say it, but it can do this, unlike Adobe Bridge. For example, type "f-number:=>22" into the Explorer search field and Windows will find all photos with a closed aperture from f/22.
Under "Edit -> Preferences -> File type assignments", you can specify which application is started when you double-click on a specific file type. Specify this at least for JPEG and the RAW formats you use.
If you have a current version of Photoshop installed, you can open Camera Raw directly from Bridge without having to start Photoshop completely. This also works with JPEGs. The command for this is Ctrl-R or a click on the aperture symbol or menu "File -> Open in Camera Raw".
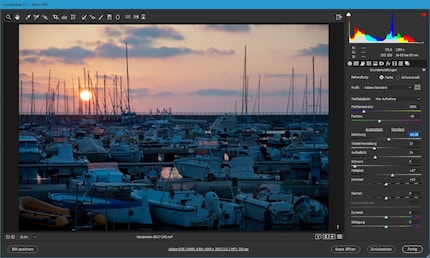
So working with Photoshop is great. Working with Lightroom, on the other hand, is a disaster. You can't open an image directly from Bridge in Lightroom. If you try to do this, the photo import from Lightroom opens instead. This has to do with the fact that Lightroom has its own file management and therefore each image must first be imported into an internal catalogue before it can be edited. Unfortunately, the import dialogue appears even if the image has already been imported.
Of course there are also other RAW converters. If they can open individual images, such as Affinity Photo, then opening them from Bridge also works. However, very few RAW converters deliver results as good as Lightroom. Capture One is certainly the most professional alternative, but it has exactly the same problem as Lightroom. It only opens the file import if you want to open a photo from Bridge.
My interest in IT and writing landed me in tech journalism early on (2000). I want to know how we can use technology without being used. Outside of the office, I’m a keen musician who makes up for lacking talent with excessive enthusiasm.