
Guide
Teardown: building an infrared camera
by David Lee

First infrared images with the self-modified camera: I prepared myself for a complicated endeavour. But it is surprisingly easy. The subsequent processing of the images is much more difficult and time-consuming.
My first test with my infrared camera immediately provided me with usable images. I just went for a little walk and snapped this and that - without a tripod and complicated preparations. According to the instructions I read on the web, infrared photography would be quite complicated. I now know: it can also be easy.
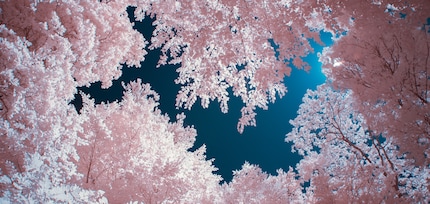
In winter, I made an infrared camera out of an old Nikon D90. There is a blocking filter in front of the sensor of a digicam that blocks infrared light. This improves the image quality for normal photography, but the filter has to be removed for infrared photos. This requires a fairly deep surgical intervention in the camera. But even I, as a handy spaz, managed to do it in a single day - with the kind help of Kevin "Dr Dremel" Hofer.
Early summer is finally the right time of year for infrared photography. The effect is particularly noticeable on green plants. As long as the trees have no leaves, you can leave the IR camera in the cupboard. Besides, it is simply too dark in winter. The more light, the better. Even bright midday light is welcome.
Removing the blocking filter alone does not produce infrared images. You need a filter in front of the lens that blocks most of the visible colour spectrum. I got myself the Hoya R72, of course in the size that fits my lens.
This filter absorbs a lot of light. Nevertheless, photography on a sunny day is possible without a tripod.
The optimum settings for landscape photography would be the lowest possible ISO sensitivity (100 ISO) and a medium aperture (f/8). With these settings, I would have to expose for so long because of the filter that I would need a tripod. But with 400 ISO and f/4 I can take hand-held photos without any problems. I usually use the wide angle and the image stabiliser of the lens. This allows me to take photos with an exposure time of 1/20 of a second without camera shake.
There's another reason why I can take photos without a tripod. The camera can display a usable live viewfinder image despite the IR filter. I can't see anything in the viewfinder of the SLR camera because the IR filter blocks the entire colour spectrum visible to me. The screen, on the other hand, shows the image as the sensor sees it, and apparently it gets enough infrared light to display a clearly visible image. Even the autofocus works.
Whether the live image is bright enough depends on the settings. The screen brightness is set to maximum, as I mainly take photos in the sun. I also use a trick to get the Nikon D90 to display a particularly bright live image. I shoot with manual settings, i.e. in M mode, and turn up the exposure compensation. The higher the exposure compensation, the brighter the viewfinder image becomes, although this has no effect on the brightness of the photo in M mode.
This means that the photo is usually darker than the viewfinder image. But this would also be the case otherwise, as the exposure measurement does not work reliably with the IR filter. This is also the reason why I shoot with manual settings.
Without the live viewfinder image, I would have to take a picture on the tripod without the IR filter in order to select the correct image composition, then screw on the filter and - probably several - attempts. In addition, after converting the SLR camera, the autofocus only works correctly in Live View. Therefore: Always use a camera with Live View for the conversion, never an old SLR camera like the Nikon D80! This will make photography a whole lot easier.
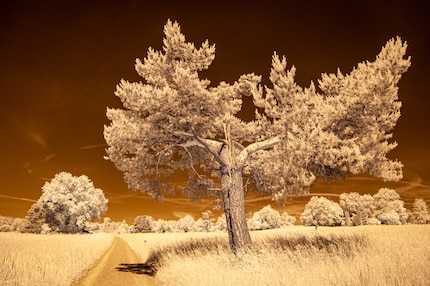
Plants with green leaves are the perfect subject for infrared photography. Of course in combination with other things, but at least a bit of greenery is always a must. The light-coloured leaves look particularly impressive against the usually very dark sky. The prerequisite for this is that the sky is not overcast. Small fair weather clouds, on the other hand, are okay, they even make the picture more interesting.
I don't normally take photos in the forest because they always fail. The camera can't cope with the big differences in brightness and always gets the colours wrong. No problem with the infrared camera: shady areas are never completely dark and overexposure is also rare. The colours don't have to be right anyway.
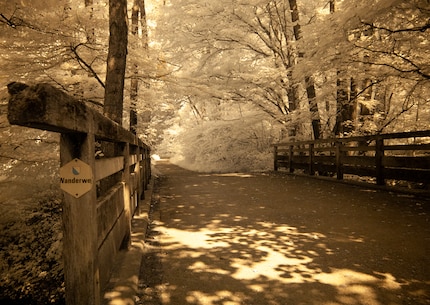
The most difficult thing for me so far has been post-processing. Partly because I can't decide on one option. Black and white is a good choice because the colour spectrum is limited anyway. But colour also has its appeal. And then there's the question: what do I colour and how?
Once I know what I want, I often can't realise it. Infrared images have a very narrow colour spectrum. When "colouring", this is pulled apart. You really need a RAW photo for this. But even with that, I can't achieve every desired colour scheme.
RAW is also necessary to correct the white balance without loss. An unprocessed infrared image looks reddish to bluish depending on the white balance. To get the colour cast out of the plants, turn the white balance to the minimum (2000 K) and the toning very strongly towards green.
As far as I know, it is not possible to colour the sky blue in Lightroom. In Photoshop it is relatively easy: With the menu command Image > Corrections > Channel Mixer. The blue channel is coloured red and vice versa.
In my photos, the sky has a reddish-brown colour, while the plants have more of a purple hue. I emphasise this small difference in post-processing.
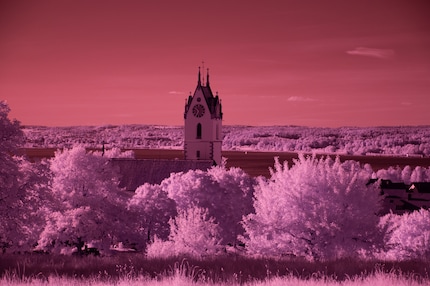
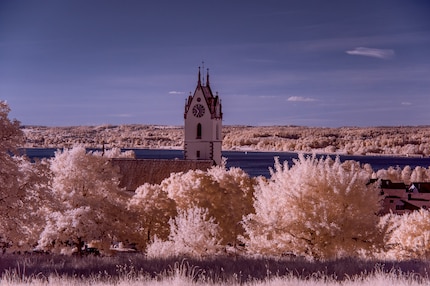
I have fun with infrared photography. It's easy to get started. It took me a moment to get the hang of it, but not so long that I got frustrated.
I could certainly improve the image quality with a tripod. But I'm satisfied. I can take more photos without a tripod, which is a clear advantage. Because it's often only when I'm editing that I find out which shots can be focussed in the desired direction and which can't.
My interest in IT and writing landed me in tech journalism early on (2000). I want to know how we can use technology without being used. Outside of the office, I’m a keen musician who makes up for lacking talent with excessive enthusiasm.
Practical solutions for everyday problems with technology, household hacks and much more.
Show all