Let's talk about 3D modelling
I’m a simple girl who enjoys the simple things in life. Drinking tea whilst reading a good book, long walks on the beach and 3D modelling under the moonlight are activities that keep my little heart beating. Of the latter, I’ve had more than I want to admit. When it comes to 3D modelling, there’s one thing you should know: It takes a lot of time.
Due to the increasing popularity of 3D printers and their decreasing prices, more and more people are getting into the wonderful world of 3D modelling. There are a bunch of objects ready to be downloaded and printed right away. But what if you found something that is almost what you need, but not quite? The need to know how to edit a 3D object will soon turn into the ability to create your own models from scratch.
I would like to ask about tips regarding software for modelling (on Mac). As far as I know, this requires a slicer. Any ideas? Thanks a lot! – Slimsheidy]]
In one of my previous articles, user Slimsheidy asked about 3D modelling software for Mac. As a fellow Mac user, I can share with you my experience with some popular programmes and mention other options I haven’t tried yet. Don’t worry, 3D modelling is time-consuming but not really that hard. So let’s start.
The programmes
During my bachelor studies, I was taught to use a wide range of software. It’s impressive how using certain programmes can change everything depending on your goal. When it comes to 3D modelling, I was formally trained to use McNeel Rhinoceros 3D, Autodesk AutoCAD and Autodesk Maya.
I learned AutoCAD in my first semester and I hated it. The tools aren’t intuitive and it’s a very clumsy programme. So let’s not talk about its 3D capabilities. A few semesters later, I found a plugin for Adobe Illustrator that mimics all the main features you would use in any CAD programme, skipping the annoying user interface: CADtools. Almost ten years later, I still use it.
My second semester brought me my first love: Rhino 3D. The fascination of that first class still lingers. Seventeen year-old me at a University in Ecuador had the impression that 3D was supposed to be complicated; but with just one click, I had in front of me a cube, then a sphere. A few clicks, commands, and hours later, a radio prototype. Anything was possible! Based on that class, I noticed that there are two types of people:
- Those who have great spatial visualisation abilities
- Those who shouldn’t be allowed near a 3D programme
Apparently, I belong to the former. I was a natural talent right from the start. At least I like to think so.
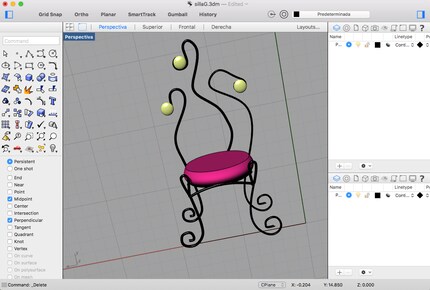
A lazy ten-minute Rhino model I did for a classmate back in 2008. This is her Tim Burton-inspired chair
During my exchange year in Chile, a teacher tried to get me interested in Autodesk Inventor. Hah! After a couple of hours staring at it, I closed it and deleted it from my computer and my memory. That’s when I knew I didn’t have a scrap of an engineer in me. If you're an engineer, you have my respect. Your nerves must be the stuff of legends and I'm sure nothing can shock you anymore.
One semester before finishing my Bachelor’s Degree, I was introduced to Maya 3D. If you’ve heard of it, you’ll know that this is the industry standard for 3D animation. For this reason, it comes with a million tools that an average user like me will never ever use, making the interface a mess of unlimited buttons and options. Click here, a menu pops up, right click, a different one appears; now do the same holding shift, or control, maybe with alt, now the space bar. Every time you’ll be faced with different menus that require a lifetime of introductions and reintroduction to have an idea where things are. I have a love-hate relationship with Maya (like with German). Despite that, working with polygons instead of splines was a treat when doing any organic shape.
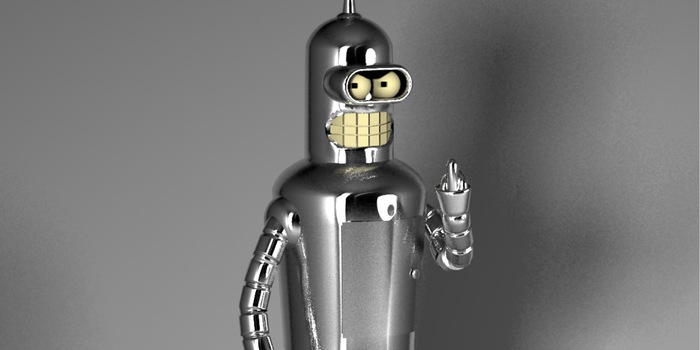
Although I learned Rhino 3D on Windows, I had a Mac at home. Back then, there was only a very basic beta of Rhino for Mac (for free! Wohooo!) with a terrible render motor (D’oh!). That's why I limited my renders to Maya with Vray, a rendering plug-in that gave all my projects an instant 10 (the highest grade).

My second project for Maya class. “Bite my shiny 3D metal ass”
A while ago, I applied for a graphic design position that required 3D modelling skills. I got the job after doing a 3D mock-up of a magazine rack for a marketing campaign in two hours.
There was a catch; their 3D programme of choice was Cinema 4D, which nobody there knew how to use. I had heard of it in college, when a couple of students who just changed universities to mine introduced their beautiful renders. Then I encountered the programme again during animation class for my master's studies. A classmate learned how to do an abstract animation that was astonishingly gorgeous and yet so simple. And now I had to learn it for my company.
As with any programme, there was a learning curve. But for some reason, 3D programmes have the steepest of them all. Being familiar with the tools from other programmes, it was just a matter of searching for them. Like using Gimp when your usual is Photoshop or Inkscape instead of Illustrator. It’s uncomfortable, it takes time. Shortcuts that are right at your fingertips are a no-go. So after two days – one struggling with the UI and some modelling, the second applying materials and animating – I did this:

Another marketing material mock-up
I’ve been using Cinema 4D as my programme of choice since then. And I love it!
There are a bunch of other options out there. It all comes down to personal preference. If your goal is to print your models, thanks to user gillespinault from Thingiverse.com, there’s this very useful chart that guides you through the most popular options. As you can see, the ones I’ve used so far mostly fall on the “Organic Shapes” spectrum. But as long as you don’t need industrial precision, anything will do.
Splines, polygons and everything else
In 3D programmes you will face two options to make your model: Splines and polygons. As with everything in life, both have their advantages and disadvantages. I’ll try to explain what they are using Rhino and Maya as examples for each. I’m not pretending to be an expert. The following information comes from my own experience, so If I get something wrong, please let me know.
Although you can work and edit both types of objects in most programmes, Rhinoceros 3D emphasizes on NURBS (Non-uniform rational B-spline) mathematical model. Splines – that’s what curves are called in computer graphics – consist of highly precise vectors located in a three dimensional space. All your splines together will shape your object.
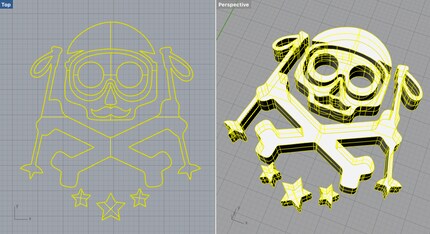
This is how a basic extrusion composed by splines looks like.
Then there's Maya. Here, you’ll pick a cube, a sphere, or any basic geometric shape consisting of a bunch of closed 2D shapes with straight edges, commonly known as polygons. To shape them, you move around the edges, vertices and faces until you get your model. It’s like playing with a digital piece of clay (for a closer experience to clay, I’d suggest ZBrush instead). So, as mentioned before, this is great for organic shapes, like in character design. That’s why this is so popular in the video game and film industry.
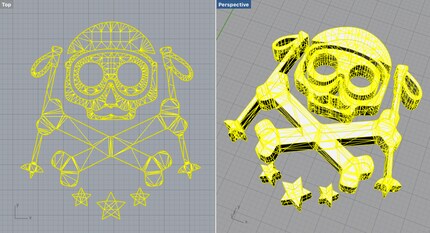
This is what the same extrusion looks like when composed of polygons.
Editing the general parameters of a NURBS object is very easy and precise compared to polygons. It also requires less computing power. You could convert a spline-based geometry to a polygon at any time, but not the other way around.
Combining both splines and polygons to get the best of both worlds is also possible. For example, in a complex situation: I’d create the basic shapes of my model on Illustrator (let’s face it, making 2D splines on any 3D program sucks). I’ll import my vectors to Rhino and rotate, extrude, join, revolve them or whatever. When I have a shape that requires some nice organic finishing, I’ll make it a polygon object and bring it to Maya for the final touches on the geometry. Add materials, lights and you are ready to render.
That was until I met Cinema 4D. Here’s the deal: Working with splines on Maya is a nightmare. Editing polygons in Rhino is a pain in the ass. Guess what – Cinema 4D does both very nicely (I still make my basic forms on Illustrator, though). If I’m doing some basic modeling that requires exact measurements and little to no aesthetic features, I stick to Rhino because of the precision. For an organic shape, I now go for Cinema instead of Maya. I don’t need all those tools. But that’s just me.
Another thing I adore about Cinema 4D is how you can apply any changes to your model like a photoshop mask. This is a wonderful feature that allows you to revise some changes without ctrl/cmd+Z to infinity.
Bringing it to the world
I was never properly trained to prepare a model for printing. During my Bachelor studies, that technology was still very limited and obscenely expensive. I was lucky enough that the school I went to on my exchange year had a 3D printer. When making a prototype for my very first print, the only thing I was told was to check if all surface normals were facing outward.
Now that I have my very own self-made 3D printer, I’ve been modelling and printing at least once a week since November. And I learned a thing or two since then. But I just noticed that this text is already too long. So stay tuned for the very detailed explanation on what the heck a surface normal is. And also how to model and prepare everything to create a custom-made iPhone car holder.
I might be a graphic designer, a Pokémon trainer and tech-savvy but I'm no creative writer. I'm on a non-stop quest against bad design. Since 2014, I call Switzerland my home.


