
From 55 to 42 dB: 3D printer fan upgrade
I love my CR-10S Pro. The print quality is brilliant out of the box. However, it is loud, damn loud. Find out how I fixed that and other fixes for the CR-10S Pro here.
The sound level meter at my desk reads over 55 dB. Far too loud to be able to concentrate on gaming or working. Unfortunately, I don't have any other space in my rented flat for the Creality CR-10S Pro 3D printer.
I need a solution. Not just for me: my wife uses our office for working from home and sewing. Three Noctua fans will initially provide a remedy.
How to make it almost whisper-quiet
I find an initial solution with Youtuber Nexi Tech. He gives his CR-10S Pro three new fans: one each for the mainboard, power supply unit and case. The problem: out of five fans on the CR-10S Pro, four have a voltage of 24 volts.

The Noctua fans that Nexi Tech and I need, however, all have a voltage of 12 volts. This is not a problem with the power supply fan, which also has 12 volts. Nexi Tech suggests connecting the mainboard and case fans in series. This means no voltage converter is needed and no soldering. I just like fixes and do it like Nexi Tech.


In the video, Nexi Tech also notes that the semiconductor relay gets very hot and moves it. This is not a problem with my model: Creality has recognised this and attached a heat sink to the solid-state relay to dissipate the heat.

When I screw the CR-10S Pro together and do a test print, I now measure around 48 dB. A relief, but still not enough for me. I decide to replace the Hotend and Filament fans as well.
Here I have the same problem as with the mainboard and case fans: The two fans to be replaced have a voltage of 24 volts, my Noctuas only 12. In addition, the filament cooler is a radial and not an axial fan. While axial fans blow air in and out parallel to the axis of rotation of the impeller, radial fans draw in air parallel to the drive axis, deflect it by 90° and blow it out radially.
I can't switch the fans serially because I want to control them separately. With PLA, I leave the filament cooler off for the first print layer and then slowly run it up to 100 per cent, layer by layer. The hotend fan always runs at 100 per cent. This time
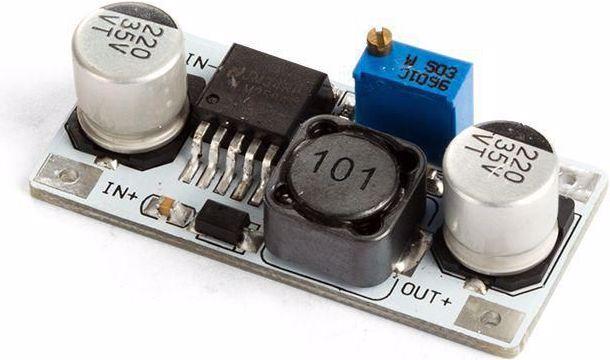
I can't avoid using a voltage converter in between.

This is done quickly for the hotend fan: I reduce the output voltage to 12 volts using the voltage converter and a multimeter. For the filament cooler, I first have to print a bracket for the Noctua fan, as I cannot operate the axial Noctua fan on the bracket of the radial stock fan. I found what I was looking for on Thingiverse without having to fire up the CAD myself.

I attach the voltage transformers to the cable cover with double-sided adhesive tape. Now I only measure around 42 dB. I like it that way, now I can concentrate on the essentials again while printing - writing texts and punching holes in zombies. A fan upgrade like this is quick to do and not just possible with the CR-10S Pro.
More fixes
Since I've been using the CR-10S Pro, I've been annoyed by something else: I always have to re-level the X-axis. If I move the extruder from left to right along the X-axis, it is usually slightly lower on the left than on the right. This is because the right-hand Z-axis - on the CR-10S Pro, the X-axis is attached to the left and right of the Z-axis - bears the entire weight of the electronics. This puts so much pressure on it that it slides down a little over time after levelling - this is fatal for precise prints.
I therefore took another tip from Nexi Tech and fitted backlash-free nuts to the X-axis mount. So it sits bombproof.

I also replaced the hotend with the All Metal Hotend from Micro-Swiss. The original hotend from Creality is only compatible with the manufacturer's nozzles. I want to try out as many nozzles as possible and the hotend allows me to do that.

I replaced the original build plate with a flexible, magnetic build plate. At the beginning, I could hardly remove the prints. Thanks to the magnetic build plate, I simply take it off after printing, flex it a little and my prints come off.
I then printed another filament guide because the filament scraped a little on the feeder. So the problem no longer occurs.
Last but not least, I recently updated to the Tiny Machines firmware. In contrast to the original Creality firmware, this offers more setting options. I'm still familiarising myself with it at the moment.
I will probably replace the auto levelling sensor soon too. I haven't had any problems with it so far. I've read on Reddit from many users that they're not happy with it at all. Maybe it will be a BL Touch, as digitec user Anonymous recommended in my hands-on for the CR-10S Pro.
From big data to big brother, Cyborgs to Sci-Fi. All aspects of technology and society fascinate me.


