Background information
3D printing: How much infill is needed?
by Kevin Hofer

The thicker the wall, the more stable your PLA prints - logical, right? Not quite. If your 3D prints consist only of wall, they can withstand less tensile force than with infill.
Zack - and one of my 3D printed hooks snaps again. This time, however, it's not my weight waistcoat that hits the ground, but the hook on my cable winch that snaps back. I recently tested the influence of infill on the pulling force. Now I'm testing the influence of the wall thickness on the pulling force. Because the hooks are getting stronger and stronger, I have to adapt my test method for this.
So far, I have used my weight waistcoat for the tests. As this only goes up to 30 kilos, I get a digital spring scale and a hand winch. From a certain wall thickness, the prints can withstand more than 30 kilos of tensile force.

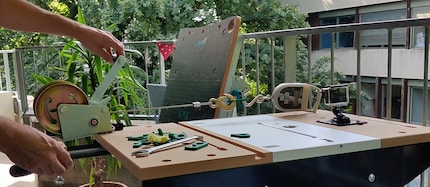
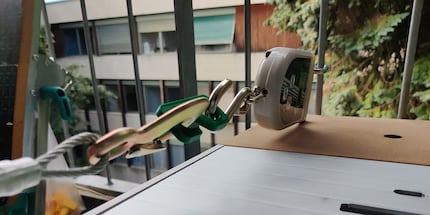
How my setup works: I attach the spring scale to my balcony railing. I attach the closed side of my 3D printed hooks to the hooks on the scale. I attach the cable winch to the other side. I pull on it and exert traction on my parts. As I can't "winch" and look at the display of the spring balance at the same time, I point my old GoPro at the display. That way I can read the last valid result. This time I'm not giving you the highest value, but the average of all three attempts.
All other parameters remain similar to last time: I create three prints of the test hooks with wall thicknesses of 0.4, 0.8, 1.2, 1.6, 2, 2.4, 2.8 and 3.2 millimetres. With my 0.4 millimetre wide nozzle, this means one wall thickness more in each case. I print the hooks horizontally, 15° diagonal to the X-axis. I print slightly diagonally because I have noticed with my Creality CR-10S Pro that the models adhere better to the build plate this way. The other settings in Cura in English:
I will test the influence of the layer height in a final test in this series.

I do the test with the Purefill filament, which performed best in the first comparison. I get a new spool to rule out ageing processes, moisture or similar signs of wear and tear. This time I'm at home on the balcony. A different setting to the last time. The temperature is 20.8° Celsius. When I tested the infill in my flat, it was between 25.7° Celsius and 26.1° Celsius.
Printing the individual models takes between 1:31 hours and 2:11 hours. The printing time increases by an average of six minutes per wall thickness. The material used increases by an average of one gram per wall thickness. Only in the steps from 1.6 to 2.0 and 2.8 to 3.2 millimetres does the material used remain the same as for the previous wall thickness. After I've printed all the hooks, I leave them to cool for 24 hours and then get straight down to testing them.
| Wall thickness in millimetres | Print time in hours:minutes | Filament used in grams |
|---|---|---|
| 0,4 | 1:31 | 17 |
| 0,8 | 1:37 | 18 |
| 1,2 | 1:44 | 19 |
| 1,6 | 1:50 | 20 |
| 2,0 | 1:56 | 20 |
| 2,4 | 2:01 | 21 |
| 2,8 | 2:09 | 22 |
| 3,2 | 2:11 | 22 |
My test doesn't meet scientific criteria because I don't work in a test laboratory. Factors such as the quality of the filament also influence the test. It is also not aimed at professional 3D printers, but at private makers like me.
Thanks to the adapted test method, it is possible to say more precisely how much tensile force the hooks can withstand. With the same parameters as last time with a layer thickness of 0.8 millimetres, I achieved a better result. Unfortunately, I can't say whether this is due to the new test method or whether the difference in temperature outside is noticeable. But I think it's the new test method. Thanks to the cable winch, I increase the pulling force evenly and don't hang the full weight at once. This results in the following values:
| Wall thickness in millimetres | Max. measured tensile force in kilograms |
|---|---|
| 0,4 | 20,9 |
| 0,8 | 24,7 |
| 1,2 | 28,3 |
| 1,6 | 31,7 |
| 2,0 | 34 |
| 2,4 | 36,9 |
| 2,8 | 39,9 |
| 3,2 | 35,5 |
As you can see, the tensile force increases by around three kilograms per wall layer. With a wall thickness of 3.2 millimetres, however, it goes in the other direction. This is probably because these hooks have too little play inside to deform. The hooks are around 6.2 millimetres thick at the weakest point, so they consist only of wall. They are stiffer and therefore tear sooner.
What does this mean for the optimum wall thickness? Based on the test results, I would work with a wall thickness of 1.6 millimetres for the test hooks. The combination of thickness, printing time and filament used seems optimal to me. Compared to the 0.8 millimetres I used for the infill test, this corresponds to around 52 per cent more tensile force. I still have to find out whether this wall thickness can simply be transferred to other print objects. If I don't take the absolute figure of 1.6 millimetres as a guide, but convert it into per cent, this would correspond to 50 per cent wall thickness on the entire object. That seems enormous to me and impractical for larger objects.
I have already fired up my printer again to test the influence of the layer height on the tensile force next. To do this, I print the hooks with 50 per cent infill and a wall thickness of 1.6 millimetres. I vary the layer height between 1.2 and 2.8 millimetres.
Speaking of traction; user adrianS84 writes:

From big data to big brother, Cyborgs to Sci-Fi. All aspects of technology and society fascinate me.
Interesting facts about products, behind-the-scenes looks at manufacturers and deep-dives on interesting people.
Show all