News + Trends
Logitech Harmony Elite: The eternal dream of a single remote control
by Luca Fontana

I have to write a TV story and need WLAN for it. Connecting to the internal company network is a nightmare from a security point of view, so I set up a network myself. Et voilà - we've already got a "How to WLAN" article for you.
Today is a special day because I get to borrow toys from senior editor Dominik Bärlocher and play around with them. Oh yes, he's not even in the office today, which makes playing around a lot more fun. He won't be able to tell me how to use it.
But from the beginning. I'm currently writing a TV story. I need WLAN for this, because modern TVs naturally need a connection to the Internet. Of course, we have an internal company network, but connecting to it with an external device is a security nightmare. And IT gets annoyed. It's much quicker and easier if I just build a Wi-Fi network myself. Easy-peasy.
How exactly does that work? Of course, I have a Swisscom box connected to a router at home and stuff like that. So I'm not completely new to the industry. But building my own network? I've never done that before. I ask Dominik for advice, and because he's not here, he sends me instructions via WhatsApp. By the way: If you're an old hand at networking, you probably won't learn anything new here. Otherwise - just read on.

So. done
Anyone who read my Harmony story on the taboo topic of remote controls will know by now that technology and I... have an interesting relationship. Let's put it this way: patience is not my core competence. Installing, connecting and linking hardware in particular always gives me moments for life.
No wonder I'm eager to find out whether Dominik's flawless and clear instructions will guide me through the procedure just as easily and confidently as it seemed when I skimmed through them.
"Yes, but wait, my overzealous IT colleague," you might be shouting, "what if I don't have a Netgear router? What then?"
Of course you will have shouted that. The above IP address actually only works with Netgear devices. There is a very simple workaround for the other brands, and it goes like this:
And you too are on board with a non-Netgear router.
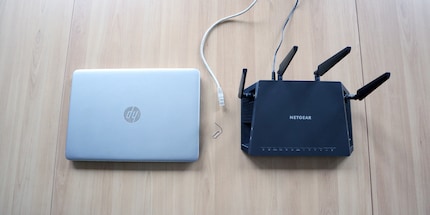
I quickly screwed on the router's antennas - a Netgear R7800, by the way, dear Dominik. As an old hand at being a pianist, I'm quite capable of making fine, gentle movements with my 1A fingers. Ensure the power supply, then press "Power On" and it's up and running. As instructed, I reset the box with an expertly selected paperclip from the Smart Office brand (and no, that's really not product placement, cough cough). After all the LED lights have blinked once in disco mode, I connect the router to my laptop via LAN cable.
By the way, if the router is new, you don't need to reset it. In my case, this was only necessary because Bärlocher had already configured his toy once before.
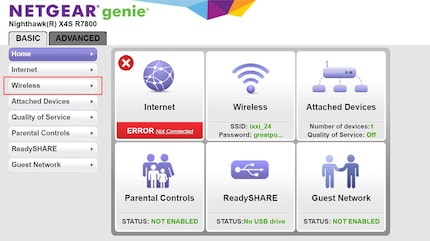
In the web browser, I call up the IP address in question. As promised by Dominik, I find the router software where I can click on Wireless.

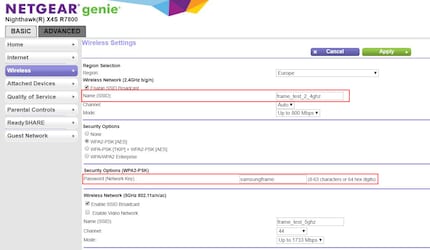
Here I can rename the WLAN network correctly and specify a simple, highly questionable password in terms of security.

Misdemeanour committed. Or to put it in Dominik's words: So. done.
I put it to the test. In other words, I select the relevant network on my mobile, log in with the password I've chosen and enjoy a flawless network connection (without the Internet, because I haven't connected the router to the Internet). Now the same procedure with the TV. And lo and behold: connection established. Thumbs up!
I'm a bit gobsmacked. It really wasn't rocket science. And it worked, just like that. I would have loved to give you an exciting episode from "Luca's fun adventures - fun and games with technology", but... there's not much more to say. Follow the instructions above and nothing will stand in the way of your own little network.
So. done.
I write about technology as if it were cinema, and about films as if they were real life. Between bits and blockbusters, I’m after stories that move people, not just generate clicks. And yes – sometimes I listen to film scores louder than I probably should.
Practical solutions for everyday problems with technology, household hacks and much more.
Show all