
One Perfect Shot: The story of how I rearranged my flat to get a photo
A snapshot for an article. That’s all I wanted. Hours later, I had rearranged my entire flat and was fiddling about with a camera and light and experimenting with light conditions with no clue of what I was doing. No clue, but an impressive result. I got my perfect shot.
It’s 9 p.m. on a Monday evening. Let me take «a quick snapshot of my beard oil and call it a night» is what I thought. Little did I know that three hours later, I’d be standing in a totally rearranged flat and experimenting with camera settings I’d only ever heard of.
I’m not a photographer, I’m a writer. I’ve taken a few good shots here and there – mainly at press events, in a natural environment and situations that aren’t staged. My knowledge about exposure time, ISO and aperture is rudimentary (to say the least) and my working method is trial and error.
Every now and then, I’m inspired with an ambition. It often begins with thinking, «Wouldn’t it be cool if...». And sometimes it ends in an article like the one on beard oil I wrote on Galaxus.
I have a Sony a7s ii – a highly impressive thing. But then again, what do I know about cameras. In the past, I took most pictures with a Canon EOS 20D, purely because that’s what was lying around in the editorial office of the daily newspaper St. Galler Tagblatt.

Let’s get to the beard oil.
It’s all about the lens and the perspective
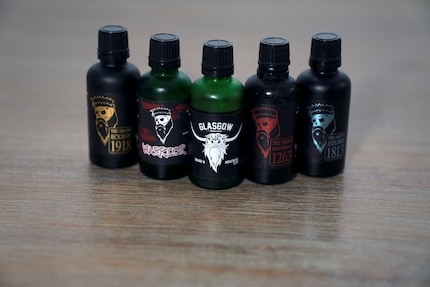
My first try
This was my first try. Rather lousy. The bottles are too small, the wooden table surface looks dull and the photo is lacking emotions. It might be OK for an article, but it wasn’t what I was looking for that time.
This was the moment when I should have realised I was not going to get much sleep that night.
So I started thinking about how to improve the picture. I once learned that anything looks mightier and more impressive from below – and small and meaningless from above.
I replaced my usual 24-70 mm lens with a wide-angle lens.
A wide-angle lens captures more of a scene, makes any objects in the centre more prominent and makes the borders appear skewed. That was what I needed to make my bottle stand out.
After a lot of photoshopping, this was the result.
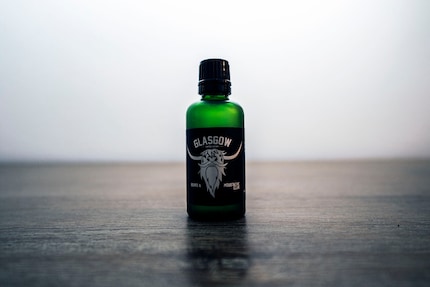
My second try
At that moment, a friend of mine – a biomedical analyst – texted me to ask what I was up to so late at night. I sent her the photo and her answer was what kept me from going to bed for another few hours.
«It’s a shame only the upper part of the bottle is illuminated,» she wrote.
Well…
Challenge accepted!
Lighting is a mystery to me. I don’t own any lamps, let alone a soft box. Even if I owned a soft box, I don’t know what these things are for or how to use them. Not yet. But this sentence «It’s a shame only the upper part of the bottle is illuminated» really inspired me.
I decided to do a proof of concept. I haven’t a clue if this is common in photography, but I wasn’t going to waste hours without having a rough idea that it could work the way I envisaged.
I took my phone, the Razer phone, switched the flashlight on and placed it behind the bottle.
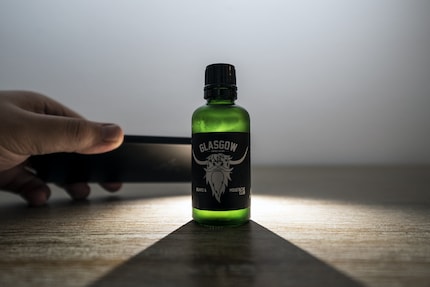
Yes, it works
That’s when the situation got out of hand
After my proof of concept was a success, I was convinced I was on to something. So I set out to find something small and bright. I didn’t want the lamp to be seen in the background – or even worse: spend hours on Photoshop trying to remove the lamp from the photo.
I assumed this would be difficult to achieve without studio lighting, especially as I wasn’t going to get my hands on any lighting this late on a Monday evening. That was when the situation got out of hand. I looked for a torch, but didn’t find one. I didn’t even know if I had one, I only remember I used to own a small MagLite torch years ago.
A photo I’d taken on a holiday the previous year came to my mind. A friend of mine stood in front of a waterfall in Iceland and I managed to take a shot of her that made all other tourists in the background disappear. As a result, the perspective was so distorted that it looked as if she was standing in front of one of Iceland’s most popular waterfalls all on her own.
Could this be how to tackle this challenge?
If so, I might be able to place my lamp behind the table in a way that makes it disappear behind the bottle. That’s if I get the camera angle right.
In the meantime, I’d texted a friend of mine who’s a photographer and told him what I was up to. I also mentioned it was going to be the most improvised setting ever.
«That’s exactly what photography is about. Improvising is key to getting to know how your camera works,» he replied while I was carrying the lamp from my bedroom to the dining room.
Let there be light
I equipped my entire flat with Philips Hue Smart Lights awhile back. It’s been 38 days since I last pressed a light switch.
To take this photograph – by the way, we’ve long crossed the border between snapshot and photograph – I went for the brightest possible setting. The one named «Energize» looked promising. I switched the spotlights on the ceiling and the standard lamp from my bedroom on and started to take photos.
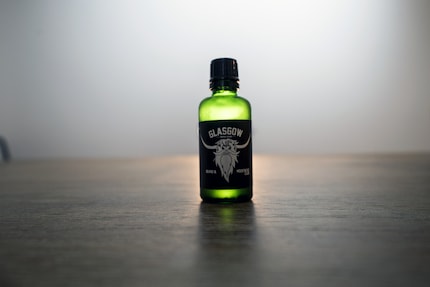
The bottle is illuminated, but the label disappears
Not bad for a start. But there’s one problem: The label is too dark. I need to fix this.
- Up ISO? No
- Close aperture? No
- Up exposure time? Not sure. Might help, but not enough.
I took a break and had a drink. It was 11 p.m. at the time, but I was wide awake. The biomedical analyst and the photographer had both gone to bed, so I was on my own.
Smart Lights to the rescue
My guess was that it had to be something about the light. The camera and lens seemed to be doing a good job; ISO 320 seemed fine, the photographs didn’t look grainy and all details were captured.
What saved me in this situation is that, although I know little about cameras, I know a lot about the lighting system in my flat. I once read about warm and cold light, which gave me the idea to make the light warmer (with slightly more yellow and red) and dim it.
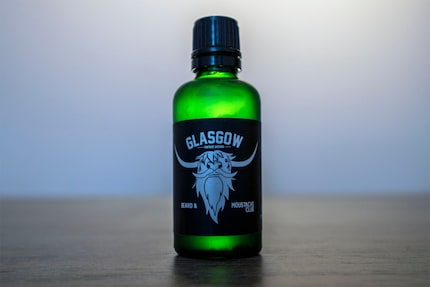
Voilà!
And that’s how my experiment came to a successful end. It was shortly after midnight, the battery in my camera was almost empty and I was exhausted.
All that’s left now is to tell you what the final setup was.
Lighting and arrangement
All I needed in the end were two lamps: The spotlights on the ceiling and the standard lamp from my bedroom with Philips Hue Smart Lights. The camera was sitting on a video tripod.
I used the standard lamp as backlight while the ceiling lamp provided light from above. The bottle is closer to the camera than the lamp, covering it up completely.
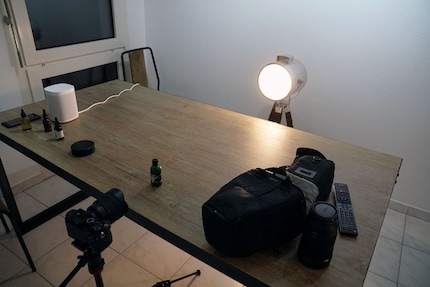
This used to be my dining room
I used a wide-angle lens to make things close to the lens appear larger and worked with these settings:
- Mode: M for manual
- Aperture: F 4.0
- Light sensitivity: ISO 320
- Exposure time: 1/8, an eighth of a second
- Focal length: 24 mm
From all that I’ve learned so far, my advice to you is to keep at it. Try out new things, experiment and don’t let anything get into your way. Not even sleep. I didn’t know what I was doing most of the time, but it was definitely worth it.
What’s your personal «one perfect shot» story? Let me know by commenting below. Who knows, we might inspire others to try out something new.
And that’s the end of my story. Happy photographing!
Journalist. Author. Hacker. A storyteller searching for boundaries, secrets and taboos – putting the world to paper. Not because I can but because I can’t not.
Interesting facts about products, behind-the-scenes looks at manufacturers and deep-dives on interesting people.
Show all


