
Background information
More space on my NAS: which HDDs are worth it?
by Martin Jud

My new NAS is called Boba Fett and has five times more memory, 16 times more RAM and a more powerful processor than the old one. But before releasing the Force, I still have to deal with the migration, which is likely to be time-consuming.
Purchasing a new NAS raises many questions. It all starts with choosing the right hardware, then come the decisions about RAID level, file system and migration. I've already published two articles explaining my choices regarding hardware and RAID level, now it's time to talk about migration.
I received the new discs a few days ago already. The boxes are still intact, I can hardly believe it, but I resisted the irrepressible urge to unpack themchiqueter to discover my Synology DS918+, the 4GB RAM expansion and the four Seagate Ironwolf 8TB drives.
I'm only getting more impatient at the thought of finally being able to unpack everything. Reading user manuals isn't my passion, but I do read Synology's Migration Tutorial before attacking the NAS assembly.
Here are the different migration options:
The choice is quickly made for me, on its homepage, Synology advises against doing a hard drive migration with my source NAS (DS212+). As for offline migration, I'm simply running out of external storage space.
Assembling the hardware is great fun, but unfortunately is done at lightning speed.
I start by installing the extra RAM - that gives me a total of 8GB. If you want to upgrade your Synology, it's important to use its original RAM. If you insert anything else or touch the already installed RAM strip, your warranty expires. The only question is whether anyone checks this in case of damage. In short, put in what you want. However, I made a conscious decision to go for the original RAM, certainly a stroke of the good student in me. Next up, check out my experience of OverRAMing.
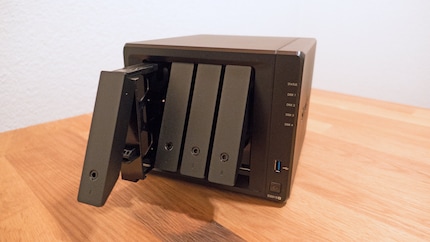
To install the RAM, you must first remove all the hard drive bays.
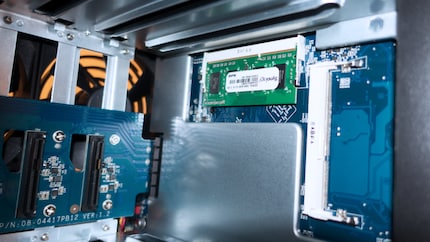
The two slots are on the inside right side.
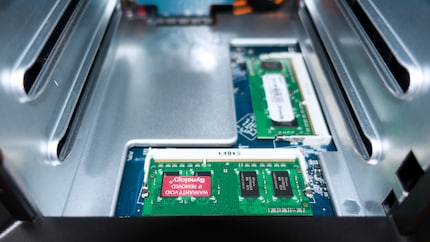
Connect the clip and push it down slightly until the clips hold it in place - that's it.
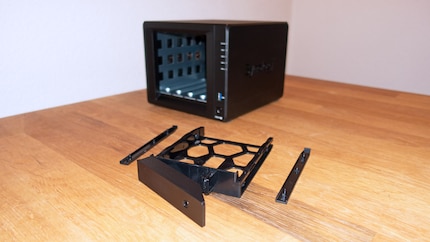
The time has come to mount the HDDs. To do this, remove the side brackets from the HDD slots...
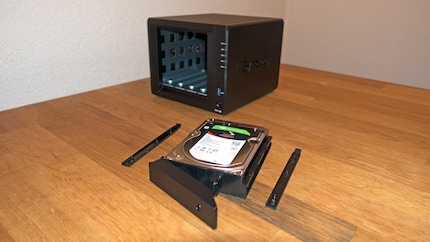
..insert the hard drive into the hard drive slot and close the media.
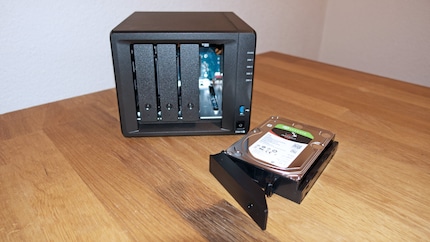
Now you can insert the disks into the NAS, secure the bays with the key, and you're done.
Power and network connect in less time than it takes to say it. I fire up my new NAS for the first time. As I expected, the new hard drives are slightly noisier than the two WD Red 3TB hard drives I was using before. That's what the product reviews suggested. No big deal, the NAS is in the office next to my gaming PC, which is still a bit noisier.
You can now access your NAS via a web browser. To do this, simply enter the IP address of the NAS and wait one to two seconds. If you don't know the IP address, you can find it by going to "find.synology.com". Alternatively, you can connect to your router to find it. It's also a good idea to assign a fixed IP to your new NAS in the router, as I did. That way, I no longer need find.synology.com and can still connect to the 192.168.1.44 IP.
On first boot, a wizard will guide you through installing the operating system (DiskStation Manager). I don't have much to say about this step: just click once on "Configuration", then on "Install" and finally confirm that all data on the inserted hard drives will be lost. After these few clicks, installation takes around ten minutes. You can then assign a server name, user name and password. My new server, affectionately known as "Boba_Fett", can now replace "R2D2".
Just a few more settings before I can start the actual migration. I launch the storage manager.
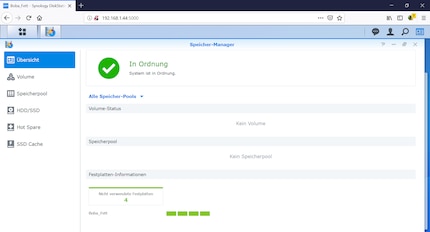
As you can see, the disks are recognized, but the storage group and volumes are still missing.
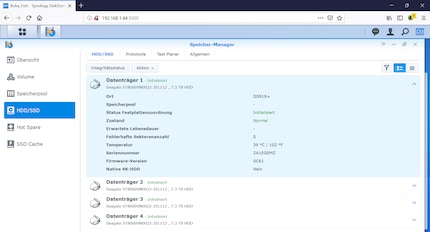
Before we start, I take a look at the state of the hard drives - everything seems to be in order. The temperature is 39°C. Exactly the same temperature as the WD-Red hard drives in the DS212+ with the fan in "silent mode".
I click on "create" in the "Storage group" tab.
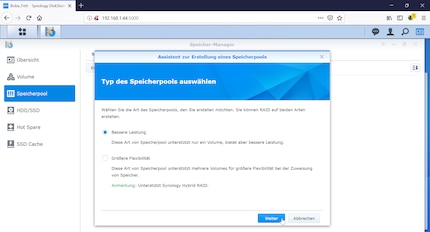
A pop-up window then asks me what type of group I want to create. I can choose between two options: "better performance" or "greater flexibility". Unfortunately, the explanations are meagre. From a technical point of view, what really changes for my NAS if I choose either option?
It doesn't really matter, as I have no intention of creating or using more than one volume. Incidentally, I'm also reluctant to use SHR (Synology Hybrid RAID). So I tick "best performance" and click "next".
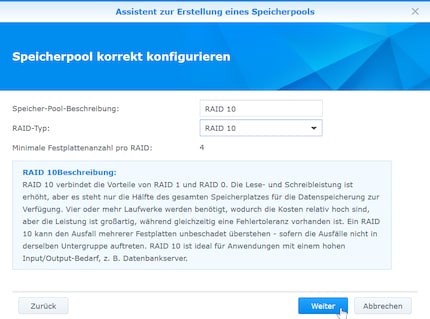
The next question is the thousand point question: which RAID level to use? The same question I pondered but failed to answer in this article. I knew, however, that it was going to come down to RAID 5, 6 or 10. After a few days' thought and a few hours' reading, I finally opted for RAID 10 for the following reasons:
If you're wondering why I didn't include SHR in my first choice: SHR 1 and SHR 2 get worse and worse results in comparative tests with RAID 5 and RAID 6 in terms of speed. Apart from that, I think SHR is just brilliant. It allows you to use disks of different sizes in a NAS without losing storage space. You can also use different volumes with different file systems. But I can do without all that with my current NAS.
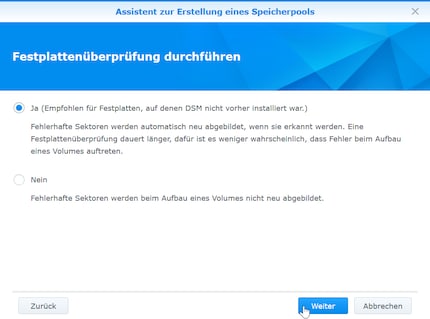
After selecting RAID 10, I'm prompted to select all the hard drives to mount. Next, the system tells me that all data on the hard drives will be erased and asks if I want to run a hard drive check. I accept.
The parity check begins and lasts 18 hours and 35 minutes in total. I no longer have access to the system (the hard disks are 80% occupied) and I take it easy. There are no errors.
Just one more step before proceeding with the migration. I click create on the "Volume" tab, select the existing storage group and enter a description.
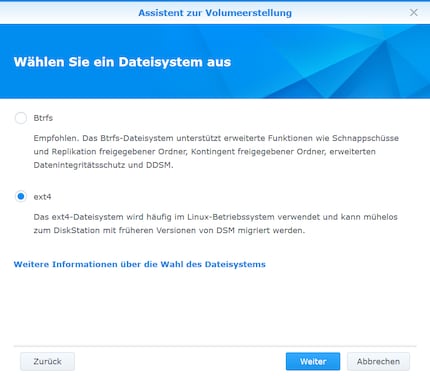
Now I need to choose the file system. I have two options: "ext4" and "Btrfs". The Btrfs file system has been touted as a potential replacement for ext4 for almost ten years now. It offers many useful features such as auto-repair of files, snapshots and more. But, compared to ext4, it lags a little behind when it comes to speed.
Although Synology recommends using Btrfs, I choose ext4. Not only because of the speed, but also because, in an emergency, ext4 allows me to read the contents of a hard drive from an external enclosure relatively easily
Creating the volume takes about a minute. Now everything is ready for migration.
Before we start, I make sure that the latest version of DSM is installed on both NASes. In addition, the "Hyper Backup" application must be installed on the source NAS. On the target NAS, you need to install "Hyper Backup" as well as "Hyper Backup Vault", then choose the "enable rsync service" option. The option can be found in the control panel under the "file services" tab, then "rsync".
To make sure my migration is a success, I need twice as much storage space on the destination NAS as on the source NAS. Why? The first step is to make a backup on the target NAS. You can then restore this backup directly from the target NAS. No problem, my new NAS has a volume of 14, TB, which is 2.67 times the required space of 2.7 TB.
I launch Hyper Backup on the source NAS. I click on "create", then "data backup task" and select the "Synology NAS remote" option.
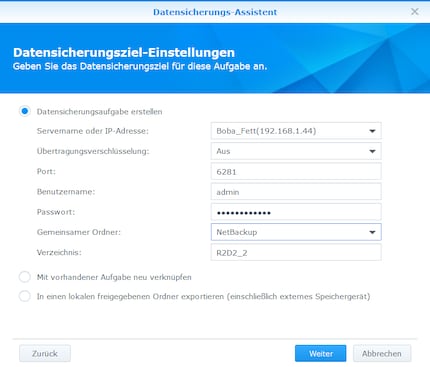
The target NAS settings are quickly defined. When I click on the server name, the system automatically suggests Boba_Fett. The port is predefined - only the username and password need to be entered. You also need to select the shared folder and target directory or accept the automatic suggestion.
In the next window, I tick all the folders intended for backup, i.e. all the folders. Then I'm asked for the applications to be backed up - I select everything, click Next and start the backup (without data compression).
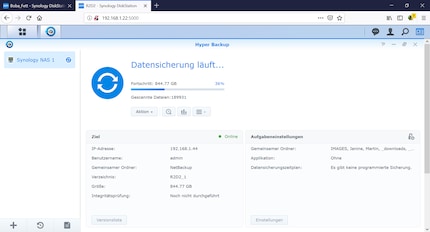
The backup takes forever. The average copy speed is 21.5MB/s. Believe it or not, but the whole process takes 36 hours and 26 minutes.
It's worse than running the marathon! Anyway, for my NAS - as for me, I just have to do some research and documenting. We'll see how long the import takes, which will add to the total time needed for the migration.
On the destination NAS, I therefore open Hyper Backup and click on "restore", then "data". I then select "Restore from existing repositories", then "Local folder & USB". We can now select the backup we've just made. Once again I can choose the folders, applications and settings to restore. I select everything, of course. Then I start the restore.
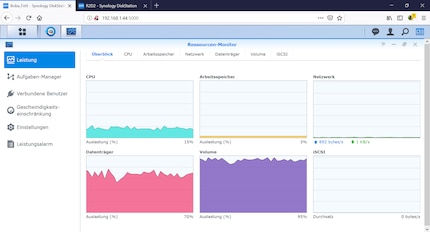
It uses almost the entire disk and volume.
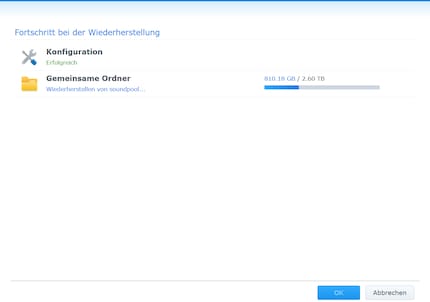
The average copy speed is 139.19 MB/s. The whole restoration process takes 36 hours and 39 minutes.
Wow, finally! All the data is on Boba_Fett. I delete the backup and am happy to recover 11.83TB of available disk space and a volume capacity of 14.43TB. In total, it took 2 days, 12 hours and 40 minutes for the NAS to perform the parity check, create a backup via the local network and restore the data. Seems pretty quick to me.
I can't wait to see what's in store for me with this new NAS, you'll be hearing from us soon. We'll certainly be talking about topics such as Plex, SSD-Cache and OverRAMing. To make sure you don't miss any of our upcoming adventures, just click on "Follow the author" a little below.
I find my muse in everything. When I don’t, I draw inspiration from daydreaming. After all, if you dream, you don’t sleep through life.
Practical solutions for everyday problems with technology, household hacks and much more.
Show all